Production Post 4

LO2: Organising my Projects

“Inspiration is rare – Don’t let a messy project kill your creativity” (Music Radar, 2017). As my songs developed, it’s important to keep my project files organised within my DAW in order to maximise my productivity. I’ve noticed that my unorganised projects often result in me wasting time looking for unlabelled tracks. The post I found on Music Radar has given me a lot of useful tips on how to organise my workflow.

Firstly, I labelled my tracks. Most tracks were labelled based on their assigned instrument (guitar, individual drums, bass, etc…). However, I labelled some of my synths by the sounds they made or the parts they played rather than their original VSTi name. For example, I labelled one synth track ‘wah’. It’s odd and minimalistic label made it easy for me to distinguish.

Some instrument tracks were duplicated for reasons like double-taking and different panning settings. I distinguished the duplicate tracks by various codes. For example:

(C) – Centred

(R) – Right

(L) – Left

(F) – Folder Track

Folder tracks in Reaper are similar to grouping or bussing in other DAWs. Any subtracks routed into a folder track will be affected by any effects or plugins applied to said folder track. In one case, I had four tracks labelled Synth 1 (F), Synth 1 (L), Synth 1 (R) and Synth 1 (C). Applying FX to folder tracks and routing subtracks into them, rather than having FX applied to individual tracks, kept my work organised, saved CPU usage and decreased project load times.

To help organise my work even further, I also colour-coded and grouped my tracks based on their instrument types. Folder tracks and their subtracks were also colour-coded. Below is an example of some of my labels and colour-coding from Track 1 V2. Folder tracks can be distinguished by the folder icons below them. The yellow tracks are minimally-used instrument tracks. I put them into the ‘Reverb Folder’ track so that they may share the same reverb plugin.


Tracks

To further save CPU usage, I also took some tips from a video (Home Music Studio 1, 2014) and rendered some of my MIDI takes. By rendering MIDI takes into audio takes, I can disable the instrument and FX plugins. I mainly applied this technique to takes on my yellow tracks as I found it would be wasteful to have so many plugins on tracks that are barely used. For example, I have one track with a music box instrument, an EQ plugin and a reverb plugin that only plays 2 notes throughout the entirety of Track 1 V2.


References

Home Music Studio 1 (2014) Lowering CPU Usage In Your Daw (Reaper). Available from: https://www.youtube.com/watch?v=7vUl2-F8G5c

Music Radar (2017) How to ogranise a DAW session and improve your workflow. Available from: http://www.musicradar.com/how-to/how-to-organise-a-daw-session-and-improve-your-workflow

Production Post 3

LO3: Developing Track 1

Download and listen to the further developed version of Track 1 HERE.

To help further develop my Track 1 demo, I’ve been taking some elements of other music and applying them to my song. One inspiration behind Track 1 is the song ‘A Little While‘ (I’ll abbreviate as ALW) by Yellow Days. The bass in my song lacked much melody and was quite slow paced compared to that in ALW. And so, I decided to create a new melodic bass line to be used in choruses. The new line helps make my song seem more upbeat and adds a little bit of excitement.

ALW often breaks up the verses and choruses with moments of silence (and reverb). I needed something to break up my musical parts but, rather than silence, I decided to create bridges with a pitch-shifting synth and music box.

I decided I needed some sort of solo or improv section within my song – something similar to the last synth that plays the song out in ALW. I decided to put this section after the first chorus. As well as having a synth play a few melodic chords, I reintroduced a synth with a ‘wah-wah’ effect that I had used in a previous song of mine, ‘Get Low’. I thought reusing certain instruments could help develop my brand image. Makeup and Vanity Set have certain synth presets that they use throughout a number of songs (Compare ‘Black Sun on the Horizon‘ and ‘A Glowing Light, A promise‘ for example).

My song structure has been much developed when compared to the first demo (which can be heard HERE). The song structure now goes as follows: Intro – instrumental chorus – verse – bridge – chorus – melodic instrumental – bridge – chorus – developed chorus.


References

A Little While‘ by Yellow Days.

A Glowing Light, A Promise‘ and ‘Black Sun on the Horizon‘ by Makeup and Vanity Set.


Tutorial 8

My tutor is happy with my blog development, with the added categories and organisation of references, but I still need to write more about production. I’ve also been given a few tips on how to better some posts I have at the moment. For example, it might be good to have some ‘before and after’ sounds to better show what progress is being made. I could also find a way to embed music and sounds onto the blog itself.

Tutorial 7

During my 7th tutorial, I was told I need to catch up on my written work as my music was developing faster than the blog. I was also given a few tips on how to better my blog. Such tips include adding a bibliography on a different page, referencing my research sources after each post and adding a Spotify reference playlist.

Production Post 2

LO1: Creating ‘Space’ Within My Mixes – Width

Since my music is mainly electronic, and is therefore written in MIDI format, I tend to mix my music as I write it. And so, I decided to research how to create ‘space’ within my mixes as soon as I could. One website I found certainly helped me form a greater understanding on ‘sonic space’ and how to create it (The Pro Audio Files, 2013).

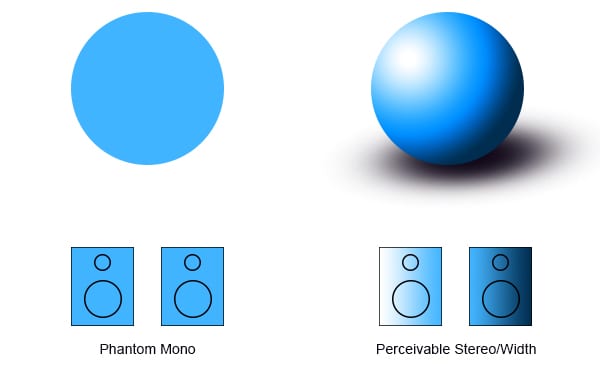
During the production of my last EP, I thought that panning a track into both left and right speakers would make it sound ‘wide’. This worked for certain VST instruments that produced contrasting sounds between the left and right outputs, hence why I never noticed the error in my beliefs. However, I’ve now learned that panning the same sound into both speakers will result in the “Phantom Mono” – A phenomenon in which we perceive a sound as coming from the centerpoint between two speakers.

I created an analogy to help me understand and remember this phenomenon. In order for the circle to be perceived as its 3D counterpart (a sphere), one side of it must contrast the other with added light and shadows. Without any light and shadows, it’ll be hard to see anything other than a 2D object. Similarly, you must have contrast between your two speakers in order to percieve an additional measurement (width).

Phantom Mono

In Track 1, I used the muted strumming of a guitar to create a ticking-sound for the introduction. However, I also wanted to add ‘width’ to the ticking. Remembering that the song ‘Wonderful World’ by Take That ended with the sound of a pocket watch, I decided to dissect the song in order to find out how the ticking was ‘widened’. After splitting the song into 2 mono tracks, I found that each speaker played a different ticking sound – one with the high frequencies cut off, and the other with the lower frequencies cut off. With this information, I applied a similar technique to my song. I duplicated the ticking sound on two tracks, panned them left adn right and changed the EQ settings on each track until there was noticible variation in each speaker. I also duplicated the sound of the slowly fading backwards guitar which can be heard playing simultaneously with the ticking. I used automated pitch shifting on each track but made them shift at different rates. This created noticable contrast in each speaker.

An arpeggiator I used in Track 3, which you can listen to HERE, was ‘widened’ by having two of the same synthesiser play different parts at the same time. With the contrasting parts being played simultaneously, I created the illusion of one instrument surrounding the listener.


References

The Pro Audio Files (2013). How to Create Width, Height and Depth in a Mix. Available from: https://theproaudiofiles.com/width-height-depth-in-a-mix/

Wonderful World‘ by Take That